Installing Ubuntu 24.04 (Noble Numbat)
If your Jetson does not support Ubuntu 24.04 (Like how the Jetson Orin Nano doesn’t at the time of writing), then following this tutorial will somehow result in you installing Ubuntu 22.04 (Jammy Jellyfish) instead, which makes absolutely zero sense but hey thats Nvidia for you.
Prerequisites
Materials:
- USB-A to USB-C cable
- Jetson Orin Nano Developer Kit with power supply
- A singular female-to-female jump wire
- The NVMe already installed on the Jetson
- Any computer with a Debian-based Linux distribution (theoretically any computer will work but you might have to adapt these commands to whatever your OS accepts)
sudo apt install -y tar gzip bzip2 xz-utils sudo wget qemu-user-static
Prepping the Jetson
Make sure the Jetson is not powered.
Allegedly you shouldn’t have to do this every time, but in reality you have to do this every time. The Jetson will not be discoverable unless it is in forced recovery mode.
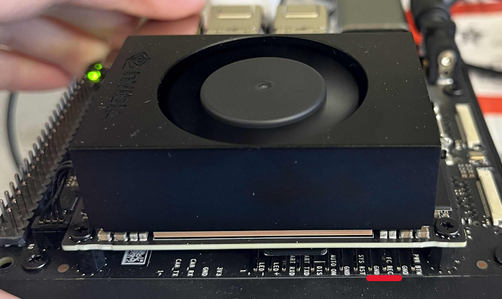
To put the Jetson in recovery mode, get a female-to-female jump wire and connect the FC REC pin to any GND pin (shown below)

After this connect the Jetson to a power source and connect it via USB-A to USB-C to your computer.
Downloading Necessary Files
NVIDIA hates you and doesn’t officially support Ubuntu24.04, so we have to use the Ubuntu22.04 drivers with the Ubuntu24.04 file system and frankenstein them together.
Go to https://developer.nvidia.com/embedded/jetson-linux-r3644 and download the Driver Package (BSP) and the cuda_driver_36.4.4.tbz2. After you are done you should have the file Jetson_Linux_R36.4.4_aarch64.tbz2 and cuda_driver_26.4.4.tbz2
Go to https://developer.nvidia.com/embedded/jetpack/downloads and download the Sample Root Filesystem. You should have file Tegra_Linux_Sample-Root-Filesystem_R38.2.1_aarch64.tbz2
Make sure all these files are saved to your Downloads/ directory.
Flashing the Jetson
Ensure all the steps from Prepping the Jetson are done and it is connected to your Debian-based computer via USB-A to USB-C. Use lsusb | grep NVIDIA to verify the connection (there should be one device attached).
Start in your user home directory. Execute each of the below steps one by one. It is presented in block format to save space
sudo ufw allow nfs

cd Downloads/

tar xf Jetson_Linux_R36.4.4_aarch64.tbz2

sudo tar -xpf Tegra_Linux_Sample-Root-Filesystem_R38.2.1_aarch64.tbz2 -C Linux_for_Tegra/rootfs/

cd Linux_for_Tegra
sudo ./tools/l4t_flash_prerequisites.sh

sudo ./apply_binaries.sh

sudo tar -xpf ../cuda_driver_36.4.4.tbz2 -C .

sudo chroot rootfs /bin/bash
apt --fix-broken install
systemctl enable ssh

exit

sudo tar -xpf kernel/kernel_supplements.tbz2 -C rootfs/

sudo ./apply_binaries.sh

# You may run into an error during this step saying no board connected or such, just unplug the Jetson and plug it back in and run the command again
sudo ./tools/kernel_flash/l4t_initrd_flash.sh --external-device nvme0n1p1 \
     -c tools/kernel_flash/flash_l4t_t234_nvme.xml \
     -p "-c bootloader/generic/cfg/flash_t234_qspi.xml" \
     --showlogs --network usb0 jetson-orin-nano-devkit internal
This will run for a minute and open a ton of downloads folders. Just wait until it’s finished. If you receive dpkg errors ignore them :)
Post Flash Setup
FIRST YOU NEED TO POWER CYCLE THE DEVICE. Unplug the USB-C cable, the jumper wire, and the power supply. It should have no connections of any type in any port or pin.
Connect the Jetson to a monitor, keyboard, mouse, and power supply.
The system should boot up as normal for any Ubuntu installation. To connect the Jetson to unl-iot follow the separate guide for that. Follow the setup wizard, name the robot, and set the password to unlrobot.
After basic Ubuntu setup is done, make sure to install Jetpack. sudo apt update && sudo apt upgrade -y && sudo apt install nvidia-jetpack
Author: Ella Moody (https://github.com/TheThingKnownAsKit)